Installing Sangoma cards under Windows
| (7 intermediate revisions by one user not shown) | |||
| Line 15: | Line 15: | ||
* Open “Device Manager” by right clicking My Computer icon, then Manage and selecting Device Manager. | * Open “Device Manager” by right clicking My Computer icon, then Manage and selecting Device Manager. | ||
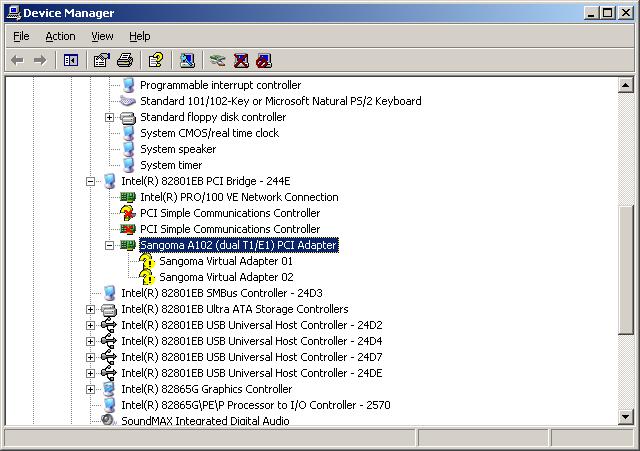
* Switch “View” to “Devices by Connection”, you should see the new card listed there. | * Switch “View” to “Devices by Connection”, you should see the new card listed there. | ||
| + | [[File:install_sangoma_1.jpg]] | ||
* If you don’t see any Sangoma adapters, you may need first to locate the PCI Bus it is connected to. | * If you don’t see any Sangoma adapters, you may need first to locate the PCI Bus it is connected to. | ||
* At this point the first level driver will be installed and started. | * At this point the first level driver will be installed and started. | ||
| Line 20: | Line 21: | ||
When the driver starts, one or two (on dual CPU cards) "Sangoma Virtual Adapters" will be enumerated and the system will launch the "New Hardware Wizard" asking for drivers for these new devices. | When the driver starts, one or two (on dual CPU cards) "Sangoma Virtual Adapters" will be enumerated and the system will launch the "New Hardware Wizard" asking for drivers for these new devices. | ||
| + | ==STEP2 - Installing the “Hardware Abstraction Driver”== | ||
To install the “Hardware Abstraction Driver” which is the next main step the following actions should be taken: | To install the “Hardware Abstraction Driver” which is the next main step the following actions should be taken: | ||
* Let the "New Hardware Wizard" to search for Drivers in "hw_abstraction_driver" directory (e.g. \A101_A102\card\hw_abstraction_driver). | * Let the "New Hardware Wizard" to search for Drivers in "hw_abstraction_driver" directory (e.g. \A101_A102\card\hw_abstraction_driver). | ||
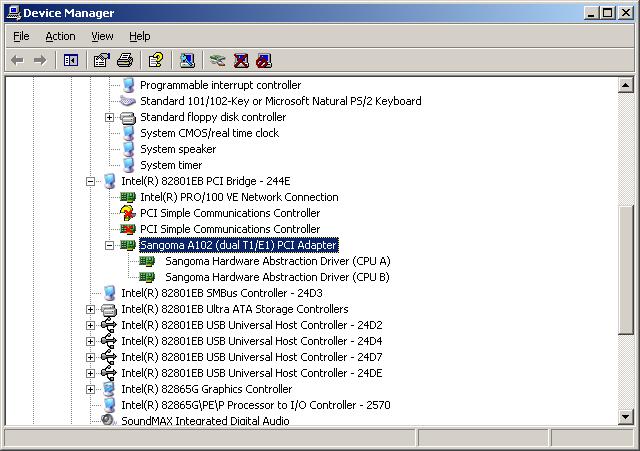
* After drivers were found and installed, in the “Device Manager” you should see the updated listing | * After drivers were found and installed, in the “Device Manager” you should see the updated listing | ||
| + | [[File:install_sangoma_2.jpg]] | ||
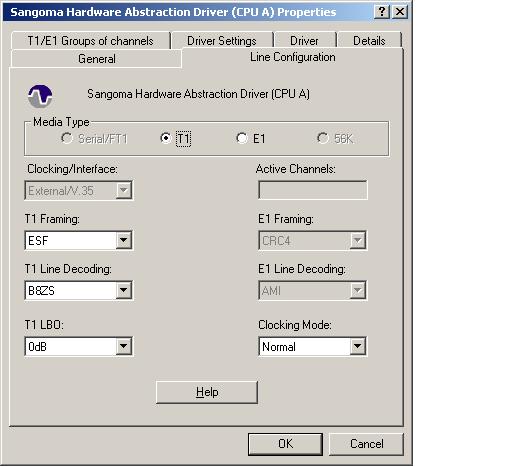
* Open the properties of "Sangoma Hardware Abstraction Driver (CPU A)" and switch to "Line Configuration" page to choose T1/E1 settings. | * Open the properties of "Sangoma Hardware Abstraction Driver (CPU A)" and switch to "Line Configuration" page to choose T1/E1 settings. | ||
| + | [[File:install_sangoma_3.jpg]] | ||
* Switch to "T1/E1 Groups of Channels" page. | * Switch to "T1/E1 Groups of Channels" page. | ||
| − | As a paranthesys at this point, the difference between E1 and T1 is that the T1 setup for ISDN uses the 24th channel as a D channel and E1 the 16th | + | As a paranthesys at this point, the difference between E1 and T1 is that the T1 setup for ISDN uses the 24th channel as a D channel and E1 the 16th. |
The Sangoma cards are using the hardware HDLC where HDLC comes from High-level Data Link Control, an ISO standard that, by short, ensures that the data passed to the next layer is received exactly as transmitted meaning in the exact order and error free. | The Sangoma cards are using the hardware HDLC where HDLC comes from High-level Data Link Control, an ISO standard that, by short, ensures that the data passed to the next layer is received exactly as transmitted meaning in the exact order and error free. | ||
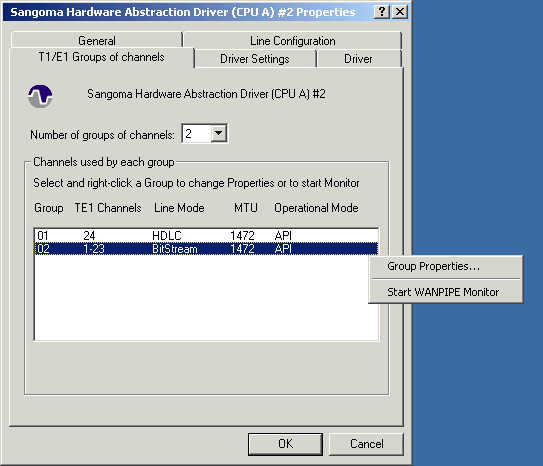
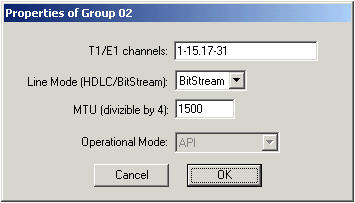
* The voice channels group is using Line Mode as BitStream. For T1 the MTU must be 1472 and for E1 the MTU must be 1500 where MTU means Maximum Transmission Unit and defines the maximum size for a packet to be transmitted. 1472 is a multiple for 23 the number of voice channels when using T1, and 1500 is a multiple of 30, the number of voice channels when using E1. | * The voice channels group is using Line Mode as BitStream. For T1 the MTU must be 1472 and for E1 the MTU must be 1500 where MTU means Maximum Transmission Unit and defines the maximum size for a packet to be transmitted. 1472 is a multiple for 23 the number of voice channels when using T1, and 1500 is a multiple of 30, the number of voice channels when using E1. | ||
| + | [[File:install_sangoma_4.png]] | ||
* The D-channel must be alone in its own first group. The B-channels (voice) should be set in the second group. For E1 the second group will have a “gap” so the channel list must be “1-15.17-31” – notice the separator is a dot, not a comma. | * The D-channel must be alone in its own first group. The B-channels (voice) should be set in the second group. For E1 the second group will have a “gap” so the channel list must be “1-15.17-31” – notice the separator is a dot, not a comma. | ||
| − | + | [[File:install_sangoma_5.png]] | |
'''See also''' | '''See also''' | ||
* [[VoIP PSTN Gateway]] | * [[VoIP PSTN Gateway]] | ||
| + | |||
| + | [[Category:Sangoma]] [[Category:Installing]] | ||
Latest revision as of 18:13, 31 October 2013
This is an how to install Sangoma cards under Windows.
To install the card the next steps should be taken:
[edit] STEP 1 - Installing the card
- Turn off your computer
- Plug in the Sangoma PCI adapter in a free PCI slot
- Turn on your computer. In Windows the "New Hardware Wizard" announcing a new component should start automatically.
- Click on "Next", choose "Display a list of the known drivers for this device..." and click again on the "Next" button.
- In the "Hardware Types:" section choose "Network adapters" subsection, click "Next" and after "Have Disk..." and browse to the “card” directory on the distribution disk that came with your adapter (e.g. \A101_A102\card).
- Click "Ok" and a list of AFT card types will be presented.
- Choose the correct card from the list. For example: "Sangoma A102 (dual T1/E1) PCI Adapter". Click "Next".
- If "Update Driver Warning" ("Installing this device driver is not recommended because Windows cannot verify that it is compatible with your hardware...") appears, ignore the warning and continue the installation.
- If the "Digital Signature Not Found" warning appears, ignore the warning and continue the installation.
- Open “Device Manager” by right clicking My Computer icon, then Manage and selecting Device Manager.
- Switch “View” to “Devices by Connection”, you should see the new card listed there.
- If you don’t see any Sangoma adapters, you may need first to locate the PCI Bus it is connected to.
- At this point the first level driver will be installed and started.
When the driver starts, one or two (on dual CPU cards) "Sangoma Virtual Adapters" will be enumerated and the system will launch the "New Hardware Wizard" asking for drivers for these new devices.
[edit] STEP2 - Installing the “Hardware Abstraction Driver”
To install the “Hardware Abstraction Driver” which is the next main step the following actions should be taken:
- Let the "New Hardware Wizard" to search for Drivers in "hw_abstraction_driver" directory (e.g. \A101_A102\card\hw_abstraction_driver).
- After drivers were found and installed, in the “Device Manager” you should see the updated listing
- Open the properties of "Sangoma Hardware Abstraction Driver (CPU A)" and switch to "Line Configuration" page to choose T1/E1 settings.
- Switch to "T1/E1 Groups of Channels" page.
As a paranthesys at this point, the difference between E1 and T1 is that the T1 setup for ISDN uses the 24th channel as a D channel and E1 the 16th.
The Sangoma cards are using the hardware HDLC where HDLC comes from High-level Data Link Control, an ISO standard that, by short, ensures that the data passed to the next layer is received exactly as transmitted meaning in the exact order and error free.
- The voice channels group is using Line Mode as BitStream. For T1 the MTU must be 1472 and for E1 the MTU must be 1500 where MTU means Maximum Transmission Unit and defines the maximum size for a packet to be transmitted. 1472 is a multiple for 23 the number of voice channels when using T1, and 1500 is a multiple of 30, the number of voice channels when using E1.
- The D-channel must be alone in its own first group. The B-channels (voice) should be set in the second group. For E1 the second group will have a “gap” so the channel list must be “1-15.17-31” – notice the separator is a dot, not a comma.
See also
