Connecting To Google Voice
(Created page with "== Google Voice Calls Through Yate server - using your SIP account == This document assesses an approachable way to set your Yate server to handle all your Google Voice calls...") |
Revision as of 17:42, 30 October 2012
Contents |
Google Voice Calls Through Yate server - using your SIP account
This document assesses an approachable way to set your Yate server to handle all your Google Voice calls (both incoming and outgoing).
The configuration I used for writing this tutorial is Mandriva 2010 spring OS, and Yate/YateClient 4.1. Other resources used are listed in the References.
Requirements
The elements involved are:
- Google Voice account
- Yate server installed and properly configured. - You need at least Yate 4.1
- SIP account logged in a SIP client softphone (we use YateClient here).
Google Voice account
I assume you have a fully active and working Google Voice account. Still, if you've never called Google Voice before, just log in your Gmail account. Get online for chat and make a call using the Voice Calling button.
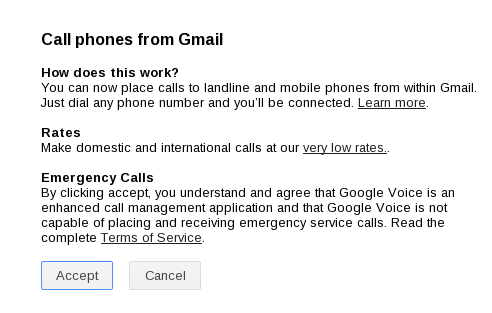
You should get this message, where you need to accept the Terms and Conditions to continue:
Now you need to go to Google Voice and log in.
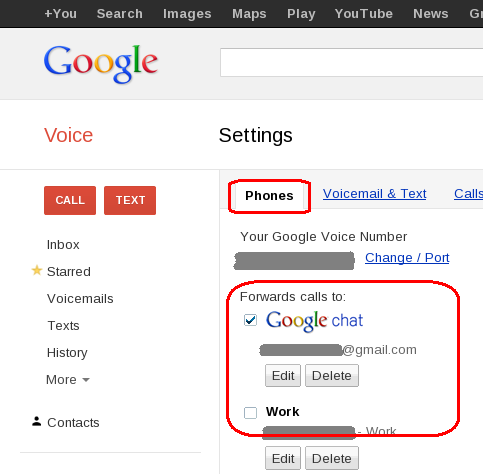
In order for this tutorial to work, you need to make sure that Google will forward all your calls to your Google chat account.
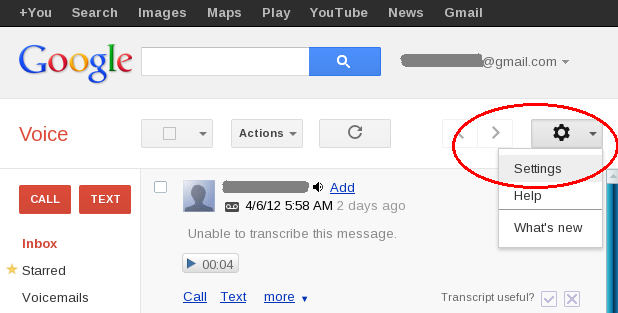
To do this, in your Google Voice account, go to Settings:
In Settings -> Phones, choose {+only+} the Google Chat option.
Just to make sure that your account is working, you should make a few test calls (both incoming and outgoing).
Note: If your Google account is set up to use two-step verification, you must add an application-specific password or Yate will not be able to authenticate. To do this, go into your account settings, find the Security section, and then edit your Two-step Verification settings. There will be a link to manage application-specific passwords. There, you can generate a password just for Yate.
Now, let's focus on the Yate server.
Yate server
Get your own Yate from the main download page and install it, according to your operating system.
You need to modify the configuration files so first locate them on your computer. Make a local copy if you want to revert later to the default settings or you can download and install Yate again.
Note: On Mac OS X, the configuration files for the server are found under /Applications/YateServer.app/Contents/MacOS/conf.d/. You can see them listed in Finder by right-clicking the YateServer from /Applications and selecting Show package contents from the menu. A Finder window listing the Contents folder should appear. From there, go to MacOS -> conf.d to find the configuration files. Further information can be found on the [and Directories] page.
Here is a list of the configuration files you need to modify and why:
'+1. regfile.conf+' - set your sip account here (username and password), in the section following the 3 commented lines.
; you have to put username as a category and password into key password
; if password is missing the module will only register but not authenticate
; if password exists and is empty will blindly authenticate anybody
[yoursipusername]
password=yoursippassword
'+2. accfile.conf+' - allow your Google Voice user to connect to Yate server. Add the following lines at the end of the file:
[GoogleVoice]
enabled=yes
protocol=jabber
username=yourgvusername
domain=gmail.com
password=yourgvpassword
options=allowplainauth
Remember that if you have two-step verification turned on for your Google account, you need to generate an application-specific password and enter that here. (Google shows it with spaces, but you can remove the spaces.)
'+3. yate.conf+' - the following line makes Yate load the jabberclient module while in the server mode. The default configuration makes Yate function as a jabber server, but in this tutorial we need Yate to be a Jabber client for Google servers.
[postload]
; Put a line in this section for each shared library that you want to load
;  after all Yate modules
; Each line has to be of the form:
;   /path/to/the/library.so=boolean
; You should specify the full path to the library. Extension is operating
;  system specific - usually .so for *NIX systems and .dll for Windows
${modulepath}/client/jabberclient${modsuffix}=yes
'+4.yjinglechan.conf+' - configure the Jingle module to function in client mode, like the jabber mode in which Yate will run.
When you find the section with the presented comments, make the necessary changes so that you have the following:
[general]
servermode=no
stanza_timeout=10000
ping_interval=100000
'+5.regexroute.conf+' - you specify what rules are applied to calls. Mainly:
->5.1. calls made to Google Voice are forwarded to your sip account. Make the modification at the end of [contexts] section.
[contexts]
; This section is used by the prerouting handler to classify calls by the
;  caller name; each call is assigned an input context (only if none exists
;  already) that is used later in the routing stage
......
${in_line}GoogleVoice=;called=yoursipusername;jingle_version=0;jingle_flags=noping;dtmfmethod=rfc2833
Also, add the following in the default section (only authenticated users will be allowed to make calls)
[default]
${username}^$=-;error=noauth
->5.2. calls made from your sip account are sent to GoogleVoice (add also in the default section, after the test tones are indicated, for example):
^\([1-9][0-9]\{6\}\)$=jingle/1513\1@voice.google.com;line=GoogleVoice;\
 ojingle_version=0;ojingle_flags=noping;redirectcount=5;checkcalled=false;dtmfmethod=rfc2833
^\([1-9][0-9]\{2\}[1-9][0-9]\{6\}\)$=jingle/1\1@voice.google.com;line=GoogleVoice;\
 ojingle_version=0;ojingle_flags=noping;redirectcount=5;checkcalled=false;dtmfmethod=rfc2833
^\(+\?1[1-9][0-9]\{2\}[1-9][0-9]\{6\}\)$=jingle/\1@voice.google.com;line=GoogleVoice;\
 ojingle_version=0;ojingle_flags=noping;redirectcount=5;checkcalled=false;dtmfmethod=rfc2833
Note: the first regexp is for 7-digit dialing (US area code 513); the second handles a 10-digit string; and the third handles an 11-digit NANPA number.
Now run Yate server - you have listed the commands for starting it on Windows or the similar commands for linux.
SIP account logged in YateClient
Using Yate Client, I logged my sip account - you should use the one set above in regfile. In case you use Yate as a server and as a SIP softphone, make sure you run the server first.
Test your configuration
In order to check if your configuration works, you need to do:
- an outgoing call: use a toll-free number for example and check if you have audio.
- an incoming call: you can call your own Google Voice number and say check your voicemail messages.
Let us know how this worked for you - using one of [contact details.]
Modules used in this configuration:
- gvoice.yate – located in modules. This sends DTMF tones at answer time (the “+1” you need to press to answer a call through Gvoice)
- regfile.yate – located in modules/server
- accfile.yate – located in modules/server.
- regexroute.yate – located in modules.
- ysipchan.yate – located in modules, needed because you'll receive and make calls through SIP protocol
- yrtpchan.yate – located in modules.
- yjinglechan.yate – located in modules.
- jabberclient.yate – located in modules/client.
- ystunchan.yate - needed behind NAT
References
[1.] Tuxguides.com post - [Server: Free Google Voice Calling] and [Voice/SIP gateway tutorial]\\ [2.] Configuration example:Connecting to Gmail. \\ [3.] About Yate as JabberClient in the server mode: JabberClientWithJingleYateServer \\ [4.] More on the Jingle module: Yjinglechan


