Yate as H323 GateKeeper and YateClient as H323 client
Contents |
Why this document
After you read this, you'll know how to:
- modify Yate's configuration files in order to use it as H.323 GateKeeper;
- use YateClient as an H.323 client;
- set up a telephony account on a SNOM 360 phone.
Main concepts
The first important issue in this article is H.323 series standard. It is a set of recommendations made by ITU, and its primary goal is to regulate protocols to provide audio-visual communication sessions on any packet network.
You can read more about it in the H.323 is the wiki-page on H.323, H.323 Primer is a very nice and short manual on the protocol and H323_Gatekeeper_And_Multiple_Endpoint_Server directs you to more details on Yate.
Test situation – scheme and presentation
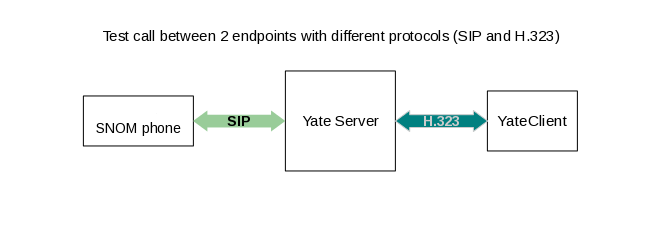
The goal is to make a call. A call to show Yate's capabilities to connect 2 ends that only know either SIP or H.323. One end will be the IP phone, snom 360, on which will set up the SIP account. The other is the H.323 account logged by means of YateClient. They will both be logged at the Yate server. See the scheme below:
So from a SIP account, logged and set up on SNOM phone, a call will be made, using Yate as a telephony server, a H.323 account, logged at the same Yate server. And the other way around.
The following steps begin to be clear:
a) Enable Yate with H.323 support. b) Set up Yate to process calls using H.323 (that is, function as H.323 GateKeeper). c) Create, set up the H.323 account on the YateClient. Log it in. d) Create, set up the SIP account on the phone. Log it in. e) Make the calls: SIP-to-H.323 and H.323-to-SIP.
Setting Yate as H.323 GateKeeper
This part of the document will take care of the first two steps in the list mentioned in the previous paragraph.
Enable Yate with H.323 support
First of all, install Yate on the computer you'll replicate the test on.
Go to the Download page and choose the latest version according to your operating system.
Please use this tutorial to make sure you install everything you need (that is Ptlib and H323Plus).
Set up Yate to process calls using H.323 (that is, function as H.323 GateKeeper).
Now, either if you just installed Yate, or already had it, go to the directory where the configuration files are.
You can find out where Yate is keeping all sorts of files and modules by typing “yate -h”. See here what information you can get on Yate's available options and commands.
IMPORTANT TIP #1! When you install yate on your system, you'll have the necessary files for it to work properly written in several locations: shared files directory (/usr/local/share/yate) conf files directory (/usr/local/etc/yate) user files directory (/home/user/.yate) modules directory (/usr/local/lib/yate) (Type “yate -h” in your bash to see more details). You can make your own modifications on the default files and run yate with the new configuration. It is strongly recommended that you write them on a different location on your computer, say /usr/local/etc/h323gk. Copy the installed version of configuration files, then modify them as you wish. |
In the beginning at least, it's better to meddle with a local copy of the configuration files. Take the advice from the tip above and set your own “test location”.
So, go to where you have the configuration files to be modified.
Look for the h323chan.conf (if you want to see what the default file contains, for a previous version, take a look here).
Open the file (h323chan.conf) and look for the section that deals with the GateKeeper [gk] settings.
Edit the parameter server setting it with the “true” value (yes, we do want Yate to function as a GateKeeper).
De-comment the line so that you make it effective. If you modify it but it's ignored in execution, this won't help our goal, so this is an important step also.
De-comment the line and change 10.0.0.1 to 127.0.0.1. This (127.0.0.1) is the localhost address, and whenever it's met, the computer refers to itself. This implies that your Yate GateKeeper will function at the local address. See more on the localhost/127.0.0.1 use in the references here and here.
h323chan.conf - it should now look like this:
[gk]
server=true
interface1=127.0.0.1
Save and exit the file.
IMPORTANT TIP #2!
To run Yate using the configuration files that you modified, and placed in usr/local/etc/h323gk, type: $yate -c /usr/local/etc/h323gk -v -d -l log_filename Now you'll have yate running as a server with the new configuration files, the rest of the neccessary modules being loaded from their standard location. Strongly recommended: When you start Yate, please make a habit of it and use the following options: -v Verbose debugging (you can use more than once) -d Daemonify, suppress output unless logged -l filename Log to file |
Using the information in the tip above (important tip #2) run the Yate with the configuration files from your own location. If you want to see more options of starting Yate please click here. This instance of Yate is able to act as a H.323 GateKeeper.
Testing YateClient as H.323 client
Create, set up the H.323 account on the YateClient. Log it in
In order to create H.323 account, search for configuration files for regfile.conf.sample and copy to regfile.conf.
Add the credentials for the user that you want to create like:
[100]
password=mysecret
Save and exit the file.
To set the account on a YateClient, first of all make sure the service is assured by the telephony server.
When you want to put in place a telephony solution, always start with the server – this ensures you have the core of your communication system.
Start the server:
$yate -c /usr/local/etc/h323gk -v -d -l log_filename
Now, run YateClient. I chose to do this from the command line, with the default specifications.
This means go to /user/src/yate/clients and type "./run-qt4":
By doing this, YateClient runs locally, from the specified directory, thus using the existing files in that location.
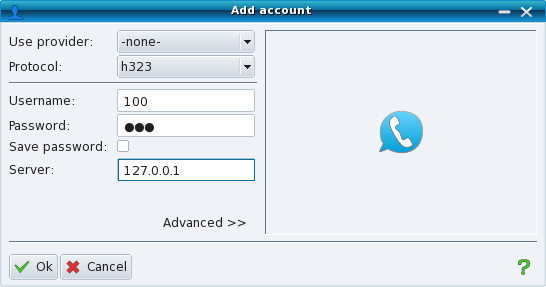
Now is the moment when the graphical interface comes to life. Either using the wizzard to add new accounts, or directly from Yate -> Add Account, add the "100".
Right now you are logged in YateClient with the h.323 account 100.
One way to test the audio is to see if you can hear the standard tones. In order to do this, you need to make sure you also have a copy of the regexroute.conf.sample file in your chosen directory, under the name of regexroute.conf. This regulates the default routes to these tones. Now, from the telephony tab, dial one of the following:
- 99991001 - you should hear in your headphones the dial tone;
- 99991002 - busy tone
- 99991003 - ring tone.
If all works fine, then it means the 100 account is usable.
Configuring Snom phone
We have reached the step where another piece of hardware except the computer is involved.
I mean, of course, the 360 snom phone.
But before we set up the account on the IP phone, we need to create it.
Creating the 200 account to be used on snom 360 phone
This is made following the exact same steps as the ones creating the "100" account. So go to regfile.conf and add section:
[200]
password=secret200
Now back to our snom phone. I assume that you already have it plugged in both to a network element (like a hub/bridge and so on) and connected to a power source. Also that it's a part of your network, so it is bound to have an address.
Let's say it has the following IP: 192.168.168.XXX
The easiest way to configure the phone is through its web interface. So either in a browser or a file manager (like Dolphin), type the IP address and access the phone. It will usually require the root password.
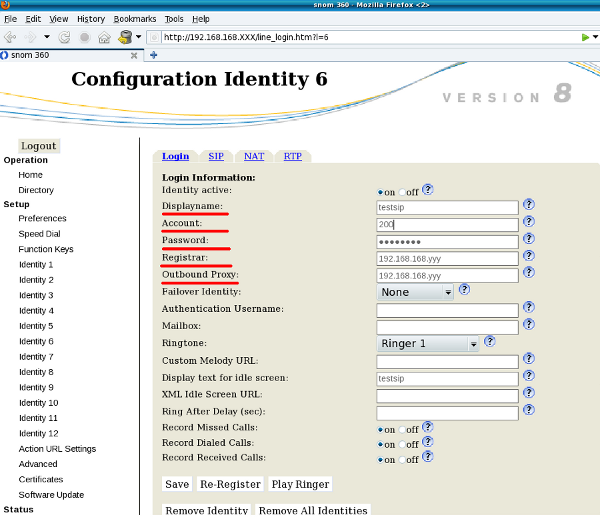
Modify the fields that you can see in this picture below:
| Displayname: | In case you have more than one accounts set up on your IP phone, this is very useful as you can see which one is active and usable. |
|---|---|
| Account: | This needs to be the exact same account name you set in the regfile. See how to set a new account, this time for the snom phone, in the previous section of this document. |
| Password: | Again, this has to be the same you set up in regfile.conf |
| Registrar: | Here, you need to put the IP address of the computer you are running Yate as H323 GateKeeper, say 192.168.168.yyy |
| Outbound proxy: | The same as above - if you want to make calls outside your local network, set the address of the telephony server that handles these outbound calls. |
Don't forget to make the account active - the first row, showing "Identity active" should be with on chosen. Pres 'Save'.
Right now the phone should reboot and take the new settings.
Call the test numbers and see if you can hear everything.
Making the desired calls
So, considering you just started your computer, do the following:
Start the Yate server.
Log the H.323 account with YateClient.
Check if the phone has the test account active.
Call 100 from snom. Your YateClient should be ringing. This is the SIP -> H.323 call.
Call 200 from your YateClient. If you have more than one account logged in, make sure that in the telephony tab the h.323 account is selected. This is the H.323 -> SIP call.
Common issues
When you have a problem, check the log file and see if you can find the cause or an error. Then check the site or the mailing list for solutions. The only thing I came across at this test exercise is this:
"Failed to open audio.Please check your sound card"
Sometimes, when I would try to call from/to YateClient, I got this notification.
The thing is: there was nothing wrong with my sound card. I just had an Internet page that also had sound enabled and this was keeping me from making/receiving calls.
The solution? closed the tab with that address.
Issue: solved.


