How to configure Yate as IAX server
Yate can be used as IAX Server and YateClient as IAX Client. This configuration will be done on platforms that have Mandriva 2010 spring OS.
The purpose of this document is:
- to know what modifications must be made for Yate to function as an IAX server.
- to be able to configure YateClient as an IAX client.
- to use Yate as a telephony engine, as it knows several widely spread protocols (IAX, SIP and H.323, just to mention 3).
Contents |
Main concepts
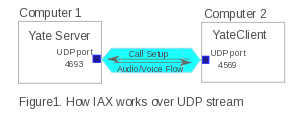
IAX is a VoIP open protocol that uses a single UDP port (usually 4569) for the channel signaling and voice streams.
This means 2 major accomplishments:
- minimizes the bandwidth used in media transmissions
- provides transparency for easier management when using firewalls and Network Address Translators
You can find out more about IAX using this links: IAX2 protocol and in the IAX page for VoIP info.
Yate is the telephony engine, currently focused on VoIP and PSTN.
YateClient is an Instant Messenger and a softphone. It is based on Yate, just like Freesentral.
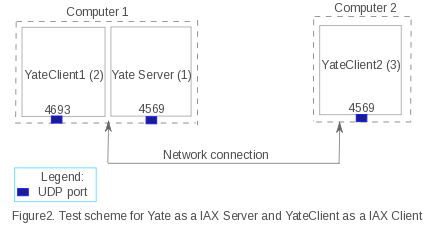
Test situation – scheme and presentation
- a functioning telephony service ---> Yate server will provide that in our case, with the proper configuration.
- two phones ---> we used YateClient for these.
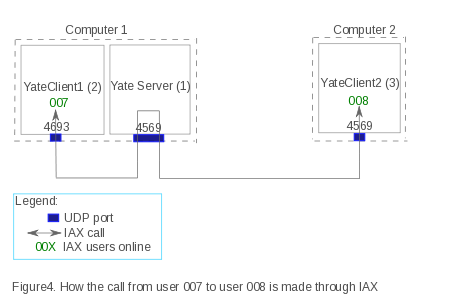
Elements in Figure2:
(1) - Yate, the telephony server, installed on a desktop computer.
(2) - YateClient1, installed on the same desktop computer.
(3) - YateClient2, installed on another computer.
Note IAX uses the same UDP port for both signaling and voice. Running on the same computer, both Yate and YateClient will try to secure and use the same UDP port (4569) for IAX,
when default configuration is used. Two programs need the same resource, and only one will be fully functional.

The configuration must be modified so that Yate and YateClient will work at the same time using different UDP ports.
Yate will use the default port, so will change the port for YateClient.
So first set up the server, then the clients. When you want to put in place a telephony solution, always start with the server – this ensures you have the core of your communication system.
Setting Yate as IAX server
On the desktop computer, logged as root, do the following steps:
Follow the instructions to install Yate on the desktop from Installation page.
IMPORTANT TIP #1! When you install yate on your system, you'll have the necessary files for it to work properly written in several locations: Path to shared files directory (/usr/local/share/yate) Path to conf files directory (/usr/local/etc/yate) Path to user files directory (/root/.yate) Path to modules directory (/usr/local/lib/yate) (Type “yate -h” in your bash to see more details). You can make your own modifications on the default files and run yate with the new configuration. It is strongly recommended that you write them on a different location on your computer, for example /usr/local/etc/iaxsrv. Copy the installed version of configuration files, then modify them as you wish. |
Make a new directory called iaxsrv located in /usr/local/etc to hold your configuration files for the IAX server.
Copy the files from /usr/local/etc/yate to /usr/local/etc/iaxsrv.
Make sure that you rename the configuration file(s) you modify, removing the word "sample". The software functions uses other files (the ones in /usr/local/etc/yate), below you will find the command to give when starting Yate so that the files you configured will be used. So end your new configuration files with ".conf".
Open the regfile.conf from /usr/local/etc/iaxsrv with any text editor. Find the 2 commented lines looking like this:
;[username]
;password=something
This indicates the way you should add any new users that will connect to your server. The semicolon in front of the row marks a comment - this means that the line will be ignored when the file will be compiled and executed. This is the way to insert new comments in Yate configuration files, with a semicolon in front. See more on configuration files and similar way of placing comments .
Add 2 users in the regfile.conf, like this:
[007]
password=pass1

[008]
password=pass2
Save the file --> Exit.
IMPORTANT TIP #2! To run Yate using the configuration files that you modified, and placed in usr/local/etc/iaxsrv, type: When you start Yate, please make a habit of it and use the following options:
-v Verbose debugging (you can use more than once)
-d Daemonify, suppress output unless logged
-l filename Log to file
-D[options] Special debugging options
t Timestamp debugging messages relative to program start
e Timestamp debugging messages based on EPOCH (1-1-1970 GMT)
f Timestamp debugging in GMT format YYYYMMDDhhmmss.uuuuuu
z Timestamp debugging in local timezone YYYYMMDDhhmmss.uuuuuu
|
Using a command line shell, run Yate, by typing:
#yate -c /usr/local/etc/iaxsrv -vvvvv -d -l log_filename -Dt
If you see inside the file log_filename the following lines:
Yate (16012) is starting Wed Mar  6 13:18:09 2013
Loaded module Javascript
Loaded module ToneDetector
Loaded module WaveFile
Loaded module YIAX
Loaded module CdrFile
Loaded module RManager
.....................
.....................
Initializing module Late Router
Initializing module Register for database
Initialization complete
Yate engine is initialized and starting up on localhost.localdomain
then you have the Yate server running.
Setting the 2 YateClients as IAX client
1. Will we start with the one that is on the same machine as Yate Server:
Yate and YateClient have to use different ports at the same time if they are on the same machine. Since Yate uses the default (4569), in YateClient modify configuration file to put a diferent port.
|
IMPORTANT TIP #3 When you choose a certain port to allocate it for IAX communication with YateClient, make sure that the port isn't used by another process.You can do that by typing in a shell: # netstat -nan | grep xxxx where xxxx is the number of the port. If you don't get a return, the port is available. It is better to use a number between 1023 and 65535, as the first 1024 (0 ... 1023) are used by system processes |
This is a very specific situation, when Yate server and YateClient work on the same computer. The reason for which it isn't needed to install YateClient separately: running YateClient means you run Yate with a graphical interface, and more functionalities (like instant messenger). So just customize the configuration file that regulates what port YateClient should use for IAX protocol.
Make a directory called yateclient1 located in usr/local/etc to hold your configuration files for the IAX client.
Copy the files from /usr/local/etc/yate to /usr/local/etc/yateclient1
Open the yiaxchan.conf from /usr/local/etc/yateclient1 with any text editor.
Find these lines in the file:
[general]
;port: int: UDP port for incoming connections
;port=4569
Remove the semicolon from the line “port=4569” and replace the number with the UDP port that you checked beforehand if it's available (see IMPORTANT TIP #3 from above), like this:
port=4693
Save the file --> Exit.
IMPORTANT TIP #4 To run YateClient using the configuration files that you modified, and placed in usr/local/etc/yateclient1, type: #yate-qt4 -c usr/local/etc/yateclient1 |
Now you'll have YateClient running using the new configuration files, the rest of the neccessary modules being loaded from their standard location. Next, the graphical interface will appear and you'll be able to log in.
Run YateClient from a shell
#yate-qt4 -c usr/local/etc/yateclient1
You'll see similar messages for the Yate server, just that the final one should be:
Yate client engine is initialized and starting up on localhost.localdomain
and then the graphical interface will appear.
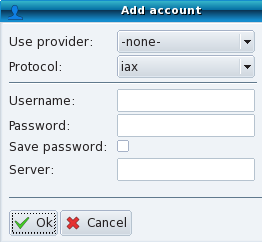
Click Yate Main Menu --> Add account and log in with your account, let's say 007:
With this parameters:
Username: 007
Password: pass1
Server: _IP_: is the IP of the machine where Yate Server was installed
Check if your account is “online” – go to YateClient Main Window --> Settings --> Accounts. The 007 account should be listed like this:
From the telephony tab, dial one of the following (what you should hear in your headphones is listed next to the number): 99991001 (dial tone), 99991002 (busy tone), 99991003 (ring tone).
These are numbers defined for testing purposes and you can find all of them in the regexroute.conf" file. When you call one of these, you'll get a standard telephony tone.
What happens right now between YateClient and Yate is this:
when the online user 007 tries to call 99991001, for example, YateClient sends a signal to Yate Signalling. Yate receives the signal on 4569 port, finds the destination and replies to the port from where it got the signal with the corresponding tone Audio/Voice.
2. Setting up the second YateClient on a different computer is easier because you just download and install it. There is no conflict with Yate telephony server on the same computer resources, so you don't change its configuration. So after you installed YateClient, run it with a similar command as the one above and add account 008, in the same way as for the other account set above.
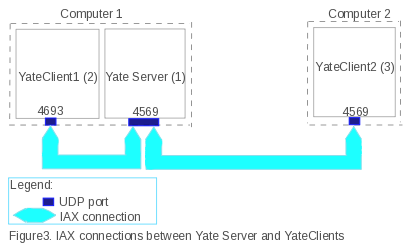
So right now we also have (2) and (3) the 2 YateClients set with their accounts registered:
Making the IAX call
Considering that you completed all the stages listed above without errors, right now 007 can call 008.
No routing is required - as the whole process of call negotiation and establishing the connection is solved by the server, Yate, internally.
Let's go over again through the steps:
- – Yate server must ran first (as root).
- – YateClient1 and 2 can ran in any order, once the server is on.
- – Logg on the users.
- – Call.
Things happen in this order, once everything is running:
007 loggs to Yate --> Yate associates 007 with UDP 4693
008 loggs to Yate --> Yate associates 008 with UDP 4569 from its machine
007 calls 008 is made up by:
007 --> Yate
Yate --> 008
so we have 007 <------> 008
Common issues
Obviously, lots of things can go wrong. I can only tell you of the ones I encountered.
- a) User is not authenticated.
- b) You cannot hear the dialtone when testing
- c) Users are logged, but the call doesn't go through.
These problems can have various solutions. For detailed troubleshooting, please make sure you use the “-v” option when you run Yate and YateClient. It shows the messages passed on between the internal modules. This shows you the settings you need to change in the configuration files in order to make it work.
See also
